
Knowde Enhanced TDS
Identification & Functionality
- Backing Material Type
- Product Type
- Technologies
Features & Benefits
- Labeling Claims
- Ready-to-Use Product Features
- Characteristics
- Bituplast® AW can also be processed without use of hot air or a propane gas flame on damp or cold (up to – 10 °C) sub surfaces.
- Bituplast® AW can also be applied to difficult points without problems, due to its extreme suppleness.
- Bituplast® AW is immediately watertight and heavy rain proof, able to bridge gaps, solvent-free. For ensuring the overlap, on the upper side of the membrane edge strips are applied on both sides.
- Benefits
- Also Processable At Low Temperatures (Up To – 10 °C)
- Even Sealing Characteristics
- Simple Processing
- Universally Applicable
- Immediate Sealing Effect
- Requires No Warming Or Drying
- The Self Adhesive Edge Promotes Rapid And Secure Overlap Sealing
- High Perforation Resistance
- High Aging Stability
- High Resistance Against Water Pressure And Water Vapor
- Self-sealing, If Slightly Damaged
Applications & Uses
- Markets
- Application Area
- Processing Temperature
- -10 to 25 °C
- Areas Of Application
Bituplast® AW is ideal for waterproofing buildings. For waterproofing vertical and horizontal areas of buildings and components against soil humidity and nonimpound leachate according to DIN 18 195 part 4, as well as against pressing water according to DIN 18 195 part 5. Pursuant to DIN 18533,Bituplast® AW is applicable for waterproofing of base plates with soil contact as well as walls / wall bases with soil contact for water penetration classes W1.1-E, W1.2-E, and W4-E. Applicable both inside and outside. For waterproofing against capillary-ascending moisture and as water vapor brake within the ground area under screeds. Also applicable in over-head areas.
Bituplast® AW is suitable above all for waterproofing:
- Outside Walls Of Cellars
- Foundations
- Balconies
- Terraces
- Flat Roofs Of Garages
- Bathrooms
- Retaining Walls
- Underground Parking
- Light Wells
- Processing
Subsurface
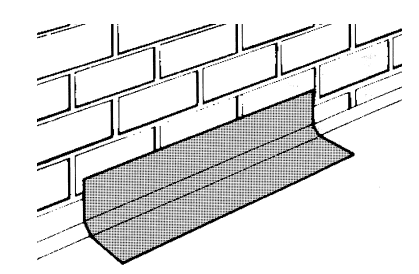
The subsurface must be clean, even, stable, free of loose components and of dust, grease, ice, hoar frost and dew. It must be ensured that the subsurface is free of hoar frost and ice at low temperatures. Sharp and pointed unevenness is to be eliminated. Brick-work must be gapless, concrete areas must be level and have a closed surface. Smaller holes, defects and filets are to be closed with a mineral repair mortar or filler before applying the undercoating. A mineral filet is to be made (side length min. 4 cm) before applying the primer before application of Bituplast® AW in wall / foot seams. Mineral systems, like e.g. filets, must be completely dry before applying the primer. All mineral subsurfaces must be primed with our special Multi Primer. No primer is required on metal surfaces or plastic subsurfaces. It must however be made certain that both metal as well as plastic subsurfaces do not have any adhesion-affecting residues. If necessary clean first. The subsurface must be oil- and grease-free as well as absorbent, i.e. it should be as dry as possible or only slightly damp. Wet subsurfaces, recognizable by a strong darkening and a moisture film on the surface, only have a low absorbency. They are to be sealed against back moisture penetration with a mineral sealing slurry. Double priming with our Multi Primer is required in the case of strongly absorbent subsurfaces (e.g. of porous concrete). Punctual and linear loads, which are reducing the functional efficiency of the sealing by impressing the membrane, are to be avoided.
Primer
The processing of Bituplast® AW may, with the exception of plastic subsurfaces, generally only take place in connection with our special Multi Primer. The Multi Primer must be checked for sufficient dryness before adhering the sealing sheet, i.e. the Multi Primer may not stain when touched and sufficient adhesion to the subsurface must be ensured. A small strip of the sealing sheet is to be glued and slightly pressed onto the Multi Primer and to be torn off again for this purpose. The adhesion is not sufficient, if more than 50 % of the subsurface primer is removed. The bonding of the sealing sheet must take place at a later point in time in this case. Sufficient adhesion is present, if the sealing sheet can only be detached from the subsurface with effort.
Processing
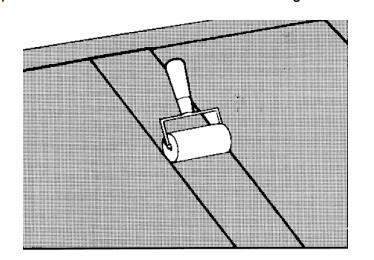
Processing may not be carried out in wet conditions (e.g. precipitation outdoors). Sticking together, contact to adhesion-reducing materials, formation of wrinkles at the seam, air pockets and embedding the protective film is to be avoided during processing. The use of a pin roller is recommended. The seam cover should be 10 cm horizontal and vertically. The possible formation of condensate on the ground coat is to be avoided when bonding in the morning hours. It can occur in the case of unfavorable climatic conditions preferentially in wall / foot seam. A dry subsurface must be achieved in this case, since bonding is not possible in such conditions. Always use a sharp knife for cutting. Dampen the knife frequently in order to avoid sticking. Avoid cutting during warmth and sun exposure. Only remove the protective paper after cutting. Cutting should be carried out on a wooden board. Using a ruler facilitates accurate cutting.
Horizontal sealing
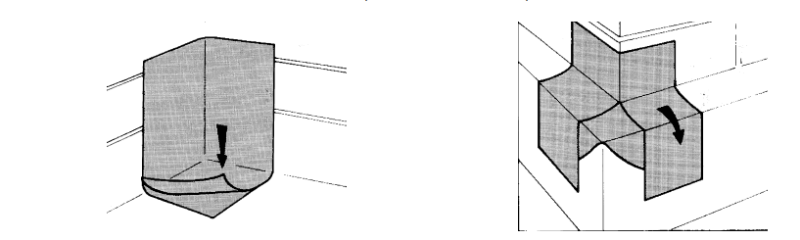
A strip of approximately 30 cm width is glued over the filet as a corner reinforcement to start with. Then adhere the vertical and horizontal layers onto the strip. Unroll approx. 50 to 80 cm of the sheeting or cuttings, detach approx. 30 to 50 cm of the protective paper at the beginning of the sheeting and press the adhesive layer, starting from the center, firmly onto the subsurface. Avoid air pockets and wrinkles. Pull the protective paper through under the sheeting and detach evenly, while simultaneously unrolling the sheeting. Firmly press the installed sheeting on, particularly in the overlapping and edge area (e.g. with manual roller). Overlap the next sheet in the overlapping area by approx. 10 cm. Particularly meticulous rolling is required in the overlapping area.
Vertical sealing for external basement walls
- All outside and interior corners and all edges are to be pasted over for reinforcement with pre-cut strips of approximately 30 cm width of the sealing sheet.
- The waterproofing of projecting outside corners (e.g. foundation shoulder) takes place with cut shaped parts made from the sealing sheet.
- Then the sealing sheets, which have been pre-cut to approximately 1 m length, are adhered overlapping laterally in each case by approx. 10 cm, within the area wall / foot seam up to incl. half of the front area of the foot. Adhering must take place from bottom to top. Before the next sheet is adhered, remove the separating foil from the self-adhesive edge.
- The sealing of the wall areas from the foot to the lower seal layer is started from the top with pre-cut sheets of suitable length. The sheet length should be cut in such a way, that the lower seal overlaps by approx. 15 cm.The sheets are laid by removing the protective paper, while simultaneously applying pressure onto the subsurface, with a lateral overlap of 10 cm. All overlaps of the sealing sheets are to be pressed firmly together with a pressure roller. Before the next sheet is laid, remove the separating foil from the self-adhesive edge.
- All of the seal endings, i.e. the sheet endings in the area of the front area foot, in the upper foundation area as well as at pipe culverts and other connections for the avoidance of rear water penetration are to be then filled with a filler on bitumen basis. The sheets are to be attached with galvanized large head nails (5 pieces per meter) or mechanically with the help of a clamping rail on the upper edge. Filling is to be repeated after the first layer has dried in the case of rough subsurfaces and e.g. with porous concrete. A reinforcing fabric is to be embedded into the bituminous filling compound in the case of pipe culverts.
- Fill vertical spaces immediately with soil after the filler has dried, cover and press horizontal areas within two weeks.
- In case of vertical areas, the upper connection of the sealing membranes to be ensured by an additional mechanical attachment (DIN 18 195).
Protection of the sealing / insulation to the ground: Immediately after sealing with the Bituplast® AW membrane, insulating wall panels or polystyrene drainage slabs can be attached. Attention has to be paid in regard to an planar subsurface. After completing the sealing works and installation of the mechanically protection of the insulating wall panels or the polystyrene drainage slabs, the excavation pit should be filled off within 72 hours. Window and door connections Bituplast® AW is to be bonded directly onto the reveal as a cutting, when sealing against the wind. An adhesive width of 4 to 6 cm is sufficient in these cases. Please ask the PVC profile manufacturer, whether bitumen incompatibilities are known.
- Laying Instructions
- When applying the self-adhesive sheets of sealing membrane, a clean level subsurface is vital. This must be as dry as possible and completely free of ridges or cavities. Masonry -based subsurfaces must have all gaps filled flush.
- All surfaces for application must be primed with our special Multi Primer. The primer coat must be allowed to fully dry out. Apply the membrane sheets on the same day. On highly porous subsurfaces (e.g. aerated concrete) a second primer coat is required (see technical data sheets).
- A sharp knife should be used for trimming the sheets, wetting it frequently to prevent it from adhering. Cutting in areas exposed to heat or sunshine should be avoided. The protective paper should only be removed after cutting is complete. Trimming of the membrane sheets is made easier if they are placed on a piece of wood and this is used as a support.
- Where the foundations project, a cement mortar channel should be constructed (4 – 6 cm sides). The hollow channel should be constructed at least 24 hours before starting to lay the sheets.
- Once the channel has hardened, both it and the overhanging foundation projection, including the external facings of the floor base, should be primed with Multi Primer. This coat must be allowed to fully dry out.
- To add strength, pre-cut strips of approximately 30 cm in width are first glued in place over the hollow channel. The same applies to internal and external corners which will have sheet applied later. To achieve adhesion, the protective paper laminated onto the rear must be removed and the exposed adhesive surface pressed down hard on the subsurface.
- Sealing of overhanging external corners (e.g. where the foundations project) is performed by applying the sheet of sealing membrane in such a way that first a square of this with cuts made in is attached over the corner, giving a double sealing layer.
- The sheets of sealing membrane, previously rolled out in lengths of about 1 m, are then cut to size and applied in the region of the wall / rail join to cover half of the external facing of the base. Application should proceed from top to bottom. There should be 10 cm overlap of the individual sheets at the sides. On application, the protective paper on the bottom should be removed in stages.
- Sealing of the wall surfaces from the plinth to the lower sealing layer is carried out from the top with sheets that have been previously cut to length. The length of the sheets should be such that there is an overlap of approximately 15 cm with the lower seal. The sheets are laid by pulling off the protective paper at the same time as pressing down on the subsurface; there should be an overlap lengthways of approximately 10 cm. To achieve the overlaps, the top layer of silicon laminate strip must be removed each time from the sheet that has already been laid. All overlaps of the sheets of sealing membrane must be pressed hard together with a pressure roller.
- Near the upper seal, the sheets should be attached mechanically as soon as they are laid to prevent them coming loose. This join can be effected with galvanized clout nails (5 per meter), with a wall edge sealing strip or with perforated tape and sealing screws. In addition, all outer ends of the sealing membrane, i.e. the sheet ends near the external facing of the base, the ends near the top of the plinth and those around pipe penetrations and other connections and joins should be sealed with bituminous filler to prevent water seeping behind them. In the case of pipe penetrations, reinforcement fabric should be bedded into the filler.
- The sheet of sealing membrane must be protected with polystyrene drainage boards. The excavated area must be backfilled immediately once the area has been finally sealed. Note: Processing should not take place at temperatures below + 5 °C (in the case of Bituplast® AW down to - 10 °C is possible) or in rain.
Properties
- Typical Properties
- Fire & Smoke Properties
| Value | Units | Test Method / Conditions | |
| Carrier Foil | Cross laminated HDPE foil | - | - |
| Length | 20.0 | m | - |
| Width | max. 1000 | mm | - |
| Weight Per Unit Area | approx. 1.5 | kg / m² | - |
| Water Vapour Permeability | min. 160 | m | DIN EN 1931 |
| Straightness | max. 20 | mm/ 10 m | EN 13969:2007, DIN-V 20000-202 |
| Thickness | min. 21.5 | mm | EN 13969:2007, DIN-V 20000-202 |
| Tensile Behaviour | min. 200 | N/50 mm | EN 13969:2007, DIN-V 20000-202 |
| Elongation Behaviour | min. 2150 | % | EN 13969:2007, DIN-V 20000-202 |
| Tear Growth Resistance | min. 100 | N | EN 13969:2007, DIN-V 20000-202 |
| Cold Bending Behaviour | min. -30 | °C | EN 13969:2007, DIN-V 20000-202 |
| Watertightness | passed | - | EN 13969:2007, DIN-V 20000-202 |
| Visible Defects | No visible defects | - | EN 13969:2007, DIN-V 20000-202 |
| Durability Against Ageing | Passed | - | EN 13969:2007, DIN-V 20000-202 |
| Value | Units | Test Method / Conditions | |
| Reaction To Fire | Class E | - | EN 13969:2007, DIN-V 20000-202 |
Storage & Handling
- Storage
Do not remove the cardboard packing before processing. Do not undercool and do not overheat (e.g. by direct sunlight) rolls and protect them against all effects of the weather (e.g. rain, dew, frost). Transport and store the rolls in a standing position. Short term transport, e.g. to the building site, can take place horizontally. Processing should not take place at temperatures under - 10 °C or during rain.
Please note:
- Bituplast® AW is to be stored coolly, because the plastic adhesive layer of the sheet warms up in summer temperatures, especially in the case of sun exposure, and can then only be processed under less favorable conditions. The sheets are to be stored at a moderate temperature if possible, in the case of low temperatures. The sheet is to be protected against moisture before processing.
- Bituplast® AW can be stored and processed the whole year over, if these conditions are observed. Bituplast® AW is to be used for areas, which are exposed to the sun (e.g. in the border area).