Knowde Enhanced TDS
Identification & Functionality
- Chemical Family
- Product Type
- Technologies
- Product Families
Features & Benefits
- Ready-to-Use Product Features
- Clean-up
- Clean spray system and equipment with MEK or acetone, MG #434.
- Key Attributes
- 2-part systems
- Superior adhesion to metals and concrete
- Excellent abrasion resistance
- Enhanced resistance against solvents
- Withstands wave solder temperatures exceeding 260°C
- Features & Benefits
- Provides excellent EMI/RFI shielding across a broad range of frequencies
- Extreme durability and adhesion
- Strong chemical resistance—except acids
- Aerosal can
Acrylic conductive paints also come in a convenient aerosol packaging. These cans are ready to spray.
- Shake the can vigorously.
- Spray a test pattern to ensure good flow quality.
- Tilt the board at 45° and spray a thin, even coat from a distance of 20–25 cm (8–10 in). Use sprayand- release strokes with an even motion to avoid paint buildup in one spot. Start and end each stroke off the surface.
- Wait 3 min before applying another coat, to avoid trapping solvent.
- Rotate the board 90° and spray again to ensure good coverage.
- Apply additional coats until desired thickness is achieved (go to step 3).
- Let dry 3 min at room temperature before applying heat cure.
- After use, clear the nozzle by inverting the can and briefly spraying until clear propellant comes out.
- Recommended Preparation
- Clean the substrate with Isopropyl Alcohol, MG #824‑1L, so the surface is free of oils, dust, and other residues.
- Paint Brush
- Dip a clean brush into the paint (⅓ of the bristle length) to load it.
- Tap both sides of the brush lightly against the side of can. This avoids drips and runs.
- Brush the coating on board using long, smooth strokes. This reduces possible air entrapment, helps create an even coat, and minimizes brush marks.
- Reload brush as soon as the coating flow starts to break.
- Keep subsequent brush strokes in the same direction; work brush into the edges of previously applied wet coating, but do not coat over wetareas.
- Wait at least 3 minutes, and apply another coat. Keep brush from curing by dipping it in thinner, and dry brush before reuse.
- Apply additional coats until the desired thickness is achieved.
Applications & Uses
- Applications
- Manual Spray Guns
Dilute your paint as per Table 1. Use a standard fluid nozzle gun to spray the diluted paint. The settings listed in Table 2 below are recommendations, however performance will vary between brands.
LVMP HVLP Inlet pressure 5–15 psi 5–15 psi Air flow 10–15 SCFM 8.3 SCFM Air cap 5–10 psi 5–10 psi Table 2. Recommended manual spray guns setting
Table 3 lists our recommendations for selecting a nozzle tip, depending on the type of filler that are used in our AR Series paints. However, nozzle tip with different diameters can be used depending on applications.
Cat. No. LVMP HVLP 838AR 1.2–1.4 mm 1.2–1.4 mm 841AR 1.2–1.4 mm 1.2–1.4 mm 842AR 1.2–1.4 mm 1.2–1.4 mm 843AR 1.2–1.8 mm 1.2–1.8 mm Table 3. Nozzle tip diameter for spraying AR series paints
If using a pressure pot and agitator, keep the agitator at low mixing speed with air pressure of 20–50 psi. Use the lowest pressure necessary to keep the particles suspended.
For best results, keep the gun-to-surface distance constant. Move the gun in a straight line along the surface, avoiding arcing motions. Use spray-andrelease strokes to avoid excess coat in one spot. If possible, start and end each stroke off the surface.
At production end or before extended stoppages, clean pot, purge fluid lines, and clean gun.- Application Guide
- Acrylic Conductive Paints This application guide outlines the equipment and recommended processes for applying MG Chemicals Acrylic Conductive Paints (AR Series). It is the user’s responsibility to determine the chemical, mechanical, and thermal compatibility of the substrate prior to using any of the suggested methods. The AR Series can be applied by paint brush, aerosol can, manual spray gun, and selective coating equipment. For large to moderate scale production runs, selective coating equipment and manual spray guns provide superior coating surfaces. The paint brush method can be used for repairs or for small scale applications, but usually do not achieve the same level of consistency and electrical conductivity as the spray methods. Dipping, while technically possible, generally requires too much effort to maintain consistent results.
- Applications
- Military and commercial electronic enclosures
- Avionic systems
- Shielding paint for flooring
- Conductive coating for electroplating metals
- Shielding in harsh environments like engine hoods
- Brush
- This product may be applied by brush or roller. Use long even strokes to minimize streaking.
- Agitated Pressure Pots or Cups
- Use a recirculation set up with an agitated pressure pot or a cup with agitator to prevent filler settlement. Transfer the pre-mixed paints to the pressure pot. Set mixing speed sufficiently high to avoid settling issues, but not so high as it can cause centrifugal effects that collect filler to the sides. Usually, 20 rpm or more is required. Preferably, use separate air lines for the air-driven mixer and the air gun. This avoids drop in mixing speed during spraying.
- Dilution
For most brush applications dilution is not required. However, when applying the AR series either by manual or selective spray equipment we recommend thinning to improve film coverage and precision.
The choice of which thinner to use will depend on the substrate type. For common plastics like ABS and polycarbonate, use MG’s 4351 Thinner 1 system whereas for other plastics like polyamide or PVC, a more aggressive thinner like MG’s 435 is recommended. Refer to Table 1 below for suggested starting dilution ratios.
Cat. No. Dilution Ratio 838AR 2:1 841AR 1:1 842AR 2:1 843AR Not required Table 1. Dilution ratios AR Series
- Mixing
The AR Series must be mixed carefully before use. If the filler is not evenly mixed, the conductivity, adhesion, and quality of the coating will vary.
Mix manually using a regular spatula, as outlined below. For larger containers, use a mechanical paint shaker or a high lift propeller mixer.- Use a spatula to scrape the bottom and sides to break up possible deposits.
- Stir content until coating becomes smooth and homogeneous.
- If lumps or deposit of material can be felt or seen, continue mixing.
After the coating has been properly mixed, it is suggested that it be kept under agitation during production.
Ensure each part is mixed individually before they are mixed together. Scrape settled material from the bottom and sides of each container and stir contents until homogenous. Next, thoroughly mix parts A and B together, in a 100:36 ratio by volume.- Protection Against EMI/RFI: Durable and Chemically Resistant
- MG Chemicals ER series are epoxy conductive paints that are designed for protection against EMI/RFI. They offer superior durability and resistance to solvents compared to other chemistries. These 2-part systems are suitable either in harsh environments with direct chemical exposure or for use on substrates like metal and concrete.
- Selective Coating Equipment
- For higher volume applications, paints can be applied via selective coating equipment. Use a system with constant fluid recirculation to keep the particles from settling in the lines. Refer to Table 3 for choosing the fluid nozzle diameter. Fluid pressure of 5–10 psi is recommended depending on nozzle size. Thin the paint to adjust the viscosity to the level appropriate for the valve being used. Recommended dilution ratios in Table 1 can be used as the starting point.
- Substrate Preparation
Most coating defects result from the presence of moisture, grease, oils, dirt, flux, and other board contaminants. Therefore, it is highly recommended to ensure the cleanliness and dryness of a surface prior to coating.
- Wipe with a clean cloth, wash with soap and water, then rinse and dry.
- Put on disposable gloves and clean with MG’s 824 Isopropyl Alcohol or any other degreasing type solvent.
- Let the surface dry fully. Elevated temperatures can accelerate drying.
To enhance adhesion, sometimes mechanical sanding or primers may be required for highly resistant plastics and non-plastics. After sanding and etching, clean the surface as per above instructions. To save time, mask areas that should not be coated prior to spraying. While the AR series can be removed with the MG’s 435 Thinner/Cleaner, masking is often more efficient. Painters tape or MG’s 862 Solder Mask can be used for masking.
Properties
- Physical Form
- Typical Properties
- Cured Properties
- Uncured Properties
- Cure Instructions
Allow to sit at room temperature for 3 minutes and then cure the paint in an oven using one of these options:
Temperature 65°C 80°C Time 4 h 2 h
| Value | Units | Test Method / Conditions | |
| Cure Times (at 65˚C) | 4 | h | — |
| Cure Times (at 80˚C) | 2 | h | — |
| Minimum Film Thickness | 50 | μm | — |
| Recoat Time | 3 | minute | — |
| Recommended Film Thickness | 90 | μm | — |
| Theoretical Coverage (at 2 mil, based on 100% transfer efficiency) | 47840 | cm2/L | — |
| Working Time | 8 | h | — |
| Value | Units | Test Method / Conditions | |
| Resistivity | 1.8 x 10⁻³ | Ω·cm | — |
| Service Temperature Range | -40 to 120 | ˚C | — |
| Surface Resistance (at 25 μm) | 0.31 | Ω/sq | — |
| Value | Units | Test Method / Conditions | |
| Calculated VOC | 779 | g/L | — |
| Density | 1 | g/mL | — |
| Mix Ratio | 100:28:00 | Weight | — |
| Mix Ratio | 100:36:00 | Volume | — |
| Solid Content | 30 | % | — |
| Viscosity (at 25˚C) ⁽ᵇ⁾ | 9 | Pa·s | — |
| Viscosity (at 25˚C) ⁽ᵃ⁾ | 35 | Pa·s | — |
Regulatory & Compliance
Technical Details & Test Data
- Technical Details
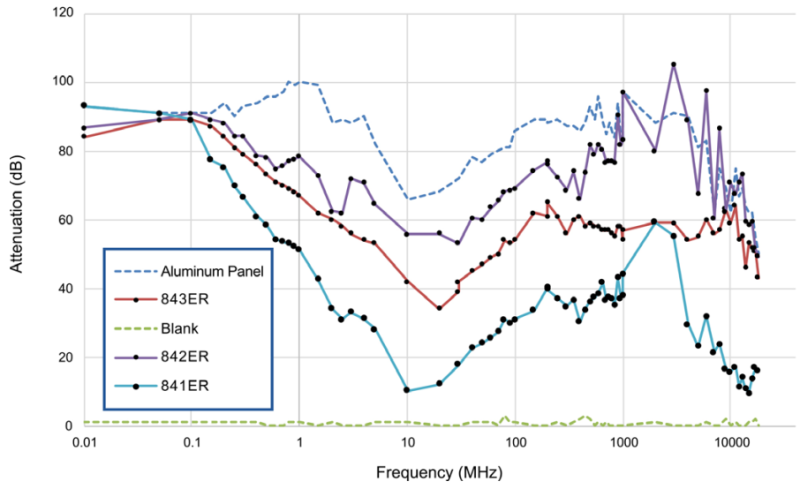
- Shielding Attenuation
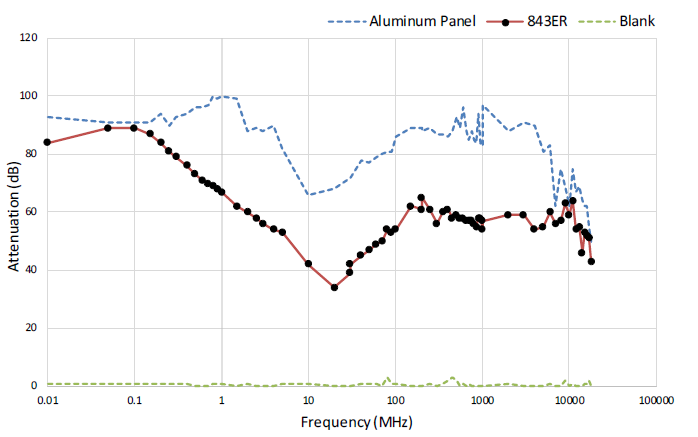
Test performed with a two-coat thickness.
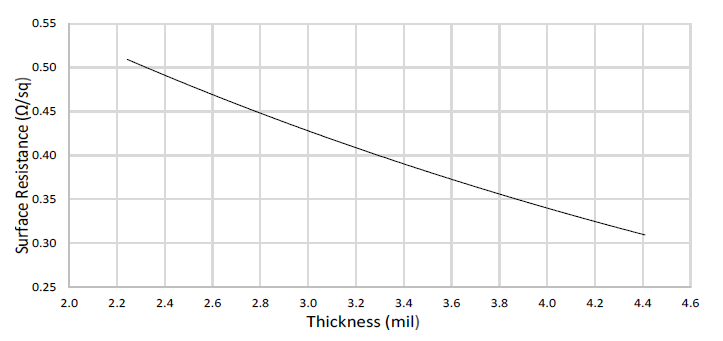
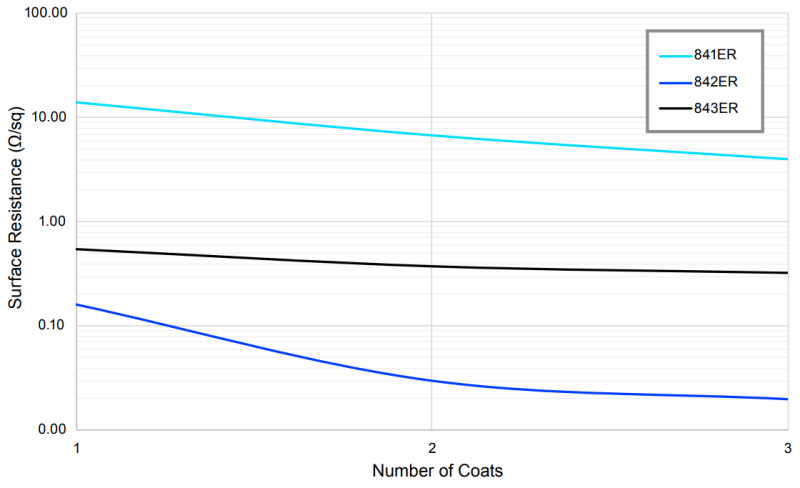
Surface Resistance by Paint Thickness
- Curing Process
At room temperature, the AR Series is dry-to-touch (known as recoat time) in 3 minutes and is dry enough to handle after 20 minutes. A full cure takes about 24 hours. To accelerate the curing time let the coating dry at room temperature for 20 minutes; no wet spots should be visible. Then, put in a convection oven at 65 °C [149 °F] for 30 minutes.
Heating a fresh coat before flashing off can trap solvent in the binder system. This can cause bubbles and blistering, as well as harming the final coat properties and thickness.
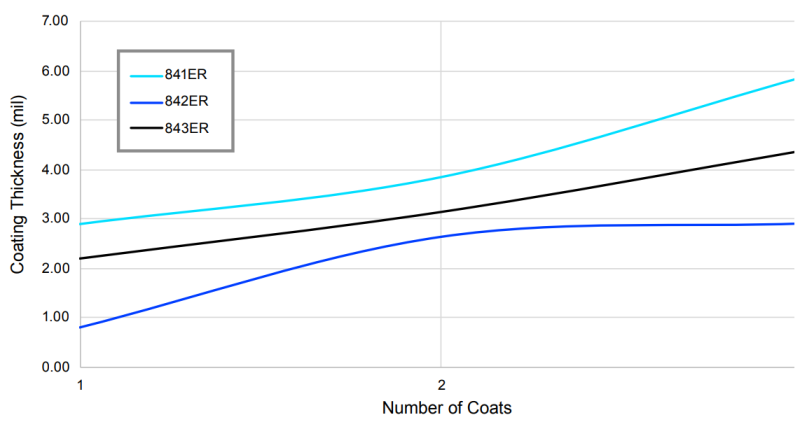
- Coating Thickness
Surface resistance of conductive coating depends on the coat thickness. Typical individual coat thicknesses for each of the ER Series can be found in Table 4.
Cat. No. Thickness per Coat 841ER 1.6 mil [40 μm] 842ER 0.8 mil [20 μm] 843ER 2.0 mil [50 μm] Table 4. Typical coating thickness of ER Series
Below figures shows thickness and surface resistances of ER Series per number of coats.
Packaging & Availability
- Available Packaging
Cat. No. Packaging Net Vol. Net Wt. 843ER-250ML 2 Can Kit 250 mL 277 g 843ER-800ML 2 Can Kit 810 mL 895 g 843ER-3.25L 2 Can Kit 3.25 L 3.59 kg
Storage & Handling
- Shelf Life
- 3 Years
- Storage and Handling
- Store between 16 and 27 ˚C in a dry area, away from sunlight (see SDS).